Thank you! Your submission has been received!
Oops! Something went wrong while submitting the form.
MENU
Step-by-step guides for setting up your school, uploading content, and enrolling your first students.

You don’t need months to launch a successful online course, digital product, or coaching program.
In this guide, we’ll break down the five simple steps you need to take to start selling on Teachable, so you can get up and running quickly.
With only one to two hours per day, you can go from an idea to a fully functioning online course, digital download, or coaching offer in a single week.
Or you can work on all of these steps at once and knock them out in a single day if you choose.
{{trial-component="/blog-shortcodes/blog-cta"}}
Teachable is the education-first platform for modern entrepreneurs, founders, creators, and business owners.
Whether you’re looking to diversify your online income streams, scale your business effectively, or package your expertise into high-value digital products, Teachable provides the tools you need to build, host, manage, and sell—all while integrating directly with your existing tech stack.
Think of us as your behind-the-scenes business growth partner, handling the tech, sales, and automation so you can focus on what you do best.
With Teachable, you can:
More than 150,000 business owners, educators, and creators use Teachable to power their online businesses and reach millions of students worldwide.
Now, let’s walk through the exact steps to build, launch, and sell your first digital product on Teachable—starting right now.
Launching your digital product is simple with Teachable. Follow these five steps to go from idea to income fast.
Let’s dig deeper into each of these steps together.
Your Teachable school is your home base—the foundation of your digital product business. This is where you'll customize your school’s branding and prepare to accept payments. In just a few steps, you’ll have a professional, fully functional school ready for your first students.
If you haven’t already, sign up for Teachable. This will give you access to our course-building tools, payment processing, and student management features—everything you need to start selling.
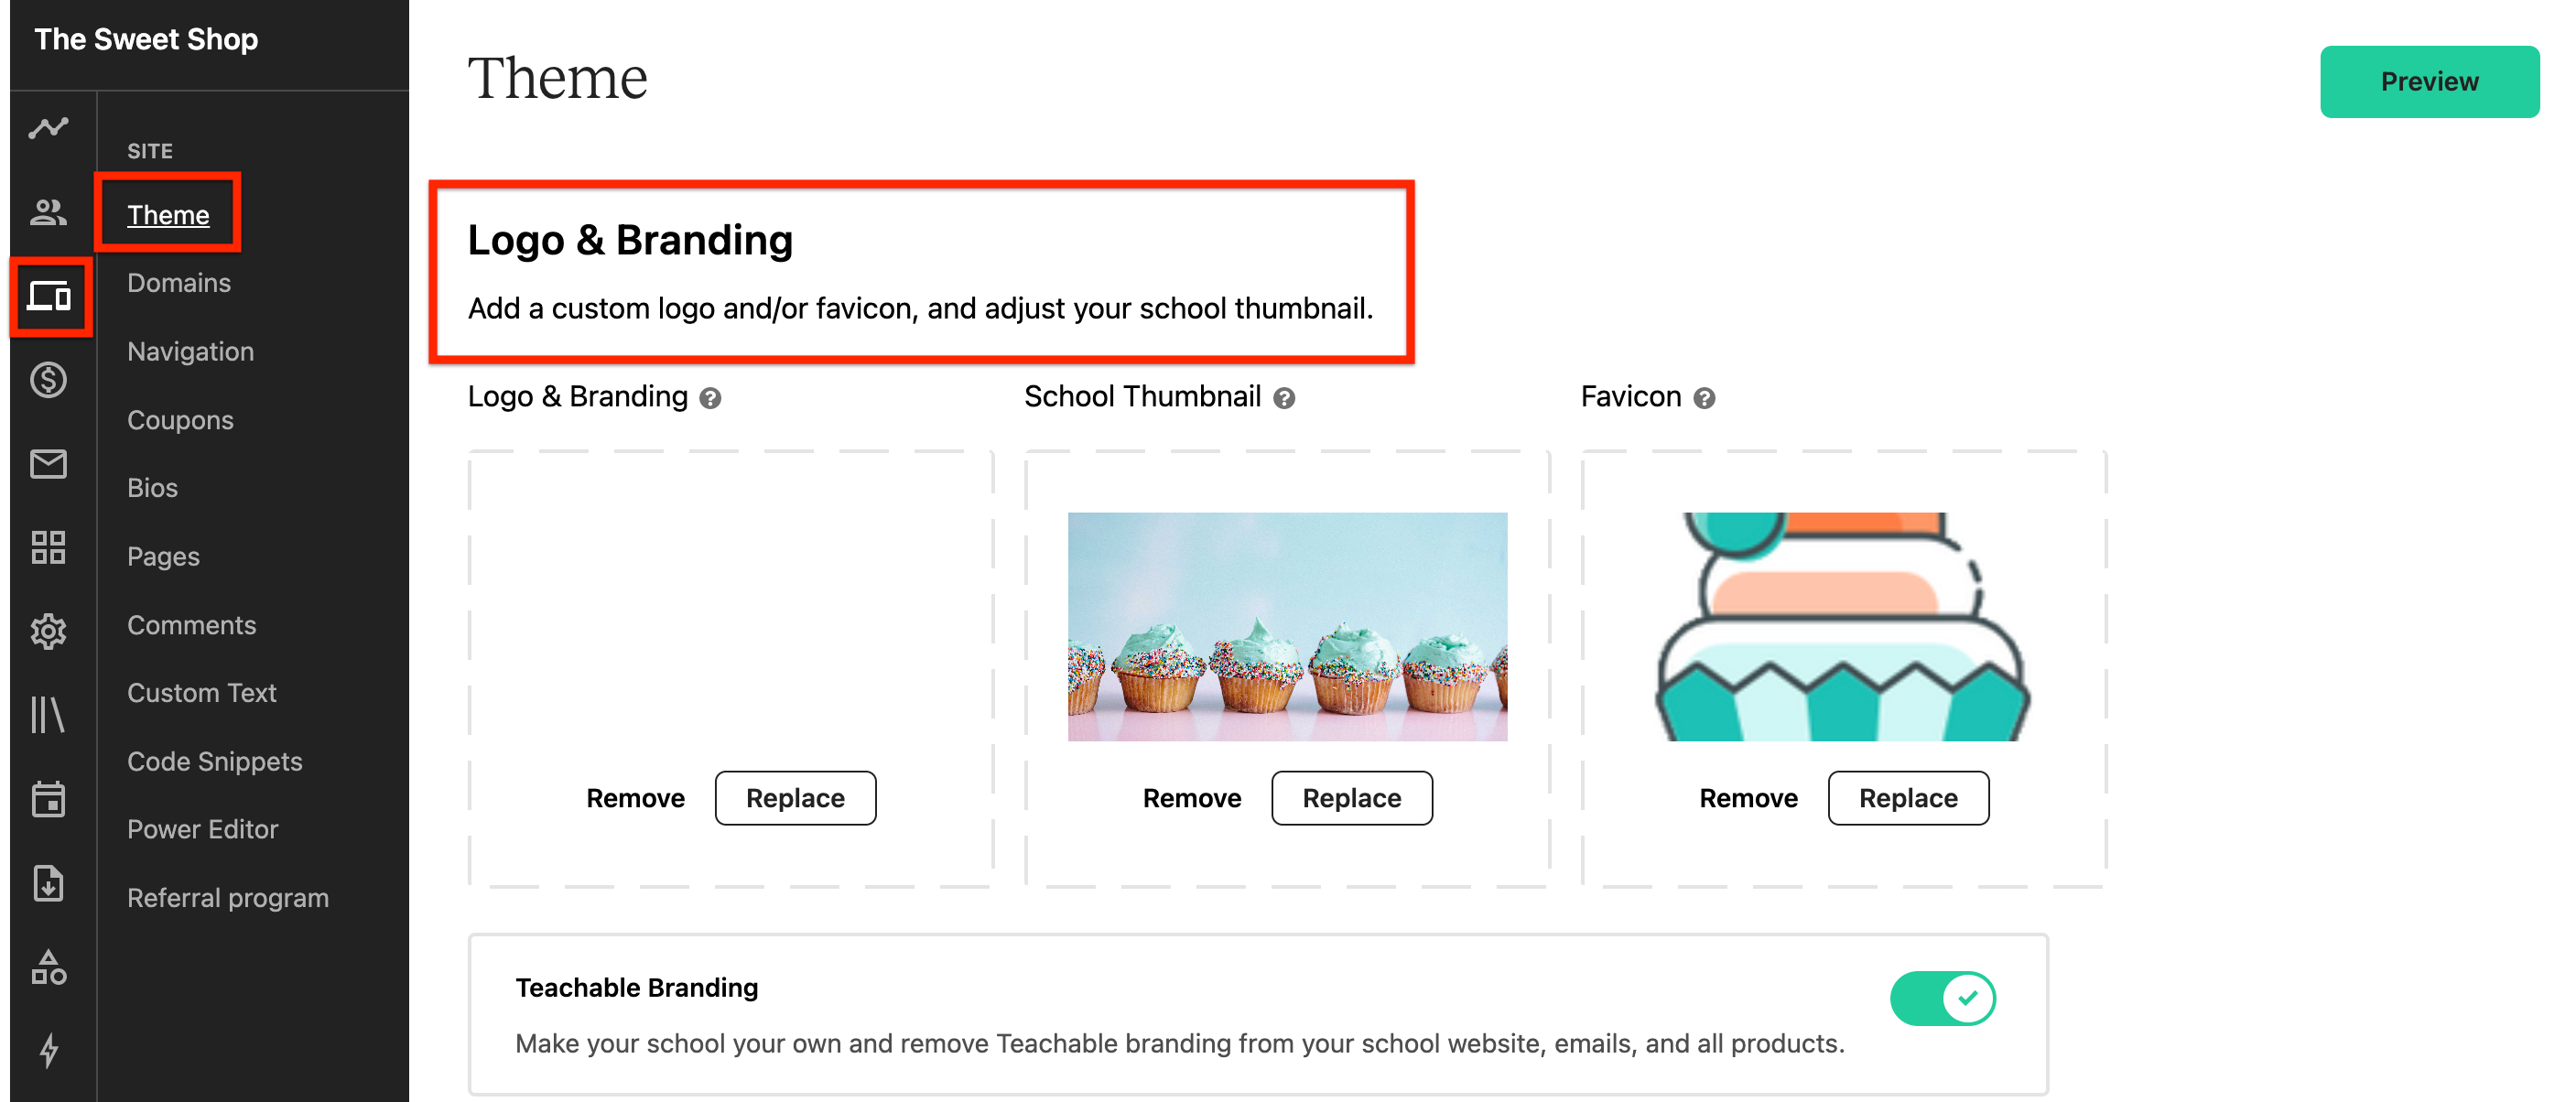
Your school name is the foundation of your brand on Teachable. Choose a name that aligns with your business, expertise, or audience. You can always update it later if needed.
Once your school name is set, customize your branding by:
You can customize your logo and branding at any time by modifying your school theme.
Your domain is a key part of building a professional brand. While Teachable provides a free subdomain (e.g., your-school.teachable.com), connecting a custom domain (e.g., yourbusiness.com) boosts credibility and creates a seamless experience for your students.
Domains may take up to 24-48 hours to fully connect. If you experience delays, double-check your DNS settings or check out this full support guide for more.
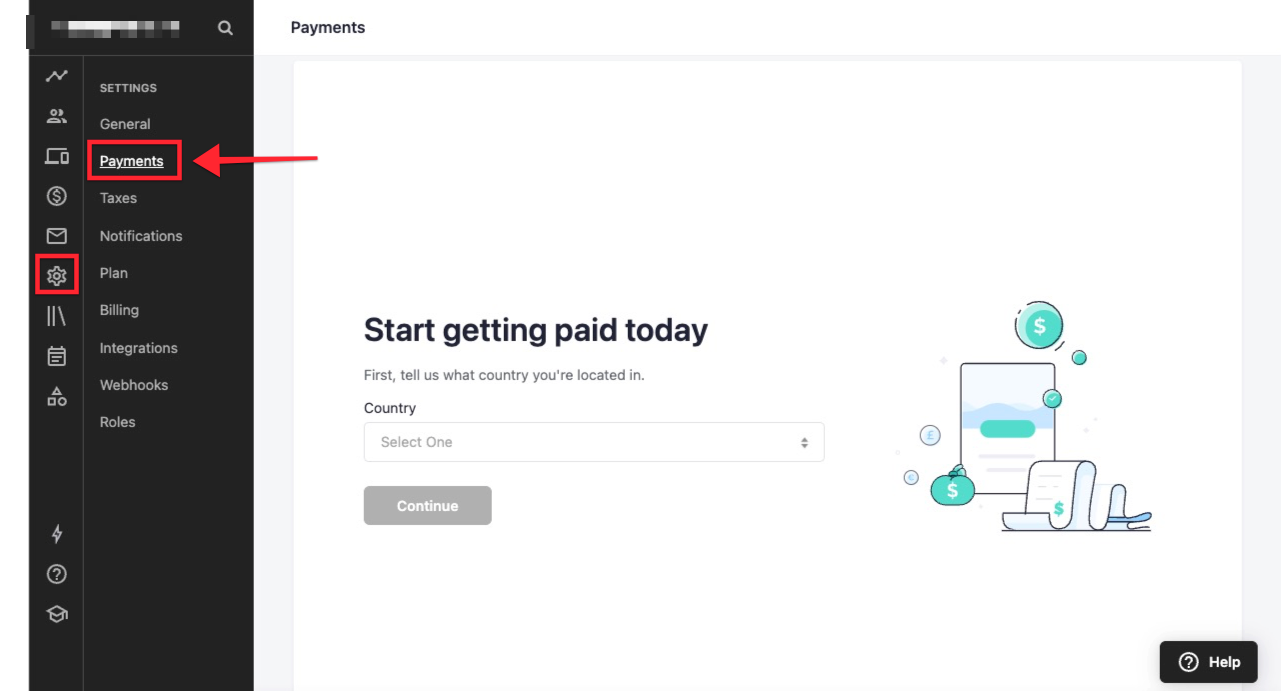
Note: It’s essential that you complete this step before you can start selling. Without a payment gateway, students won’t be able to purchase your products, and you won’t be able to get paid.
Teachable Pay is the fastest and most seamless way to process payments on Teachable. It allows you to:
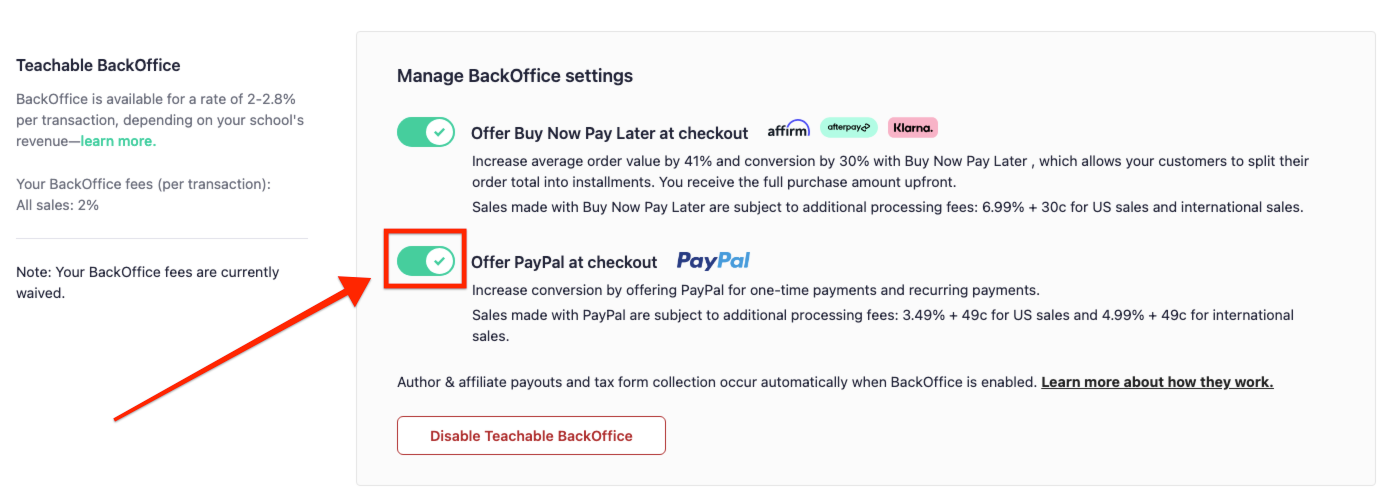
PayPal is a trusted payment method that can increase conversions by giving students an easy way to pay. To enable PayPal:
BNPL allows students to split their payments into multiple installments, making high-ticket products more accessible. For example, a product priced at $200 could be split into 4 even payments of $50, making it much easier for your student to purchase immediately.
To enable it:
Here’s an additional quick support article around setting up your payments on Teachable Payments.
Now that your Teachable school is set up, the next step is to configure pricing and checkout settings. This process allows you to test payment functionality, experiment with pricing strategies, and get familiar with the Teachable checkout system—before your actual product is live.
At this stage, you don’t need to have a fully built product. Instead, you’ll create mock or placeholder products to set up pricing, test different checkout options, and ensure everything works smoothly when you're ready to sell.
Before setting up pricing, you’ll create a temporary mock product that allows you to explore different pricing models without needing a finished course or download.
Now, you can experiment with different pricing options:
To set up pricing:
This step allows you to see how pricing displays on your checkout page and adjust it before launch.
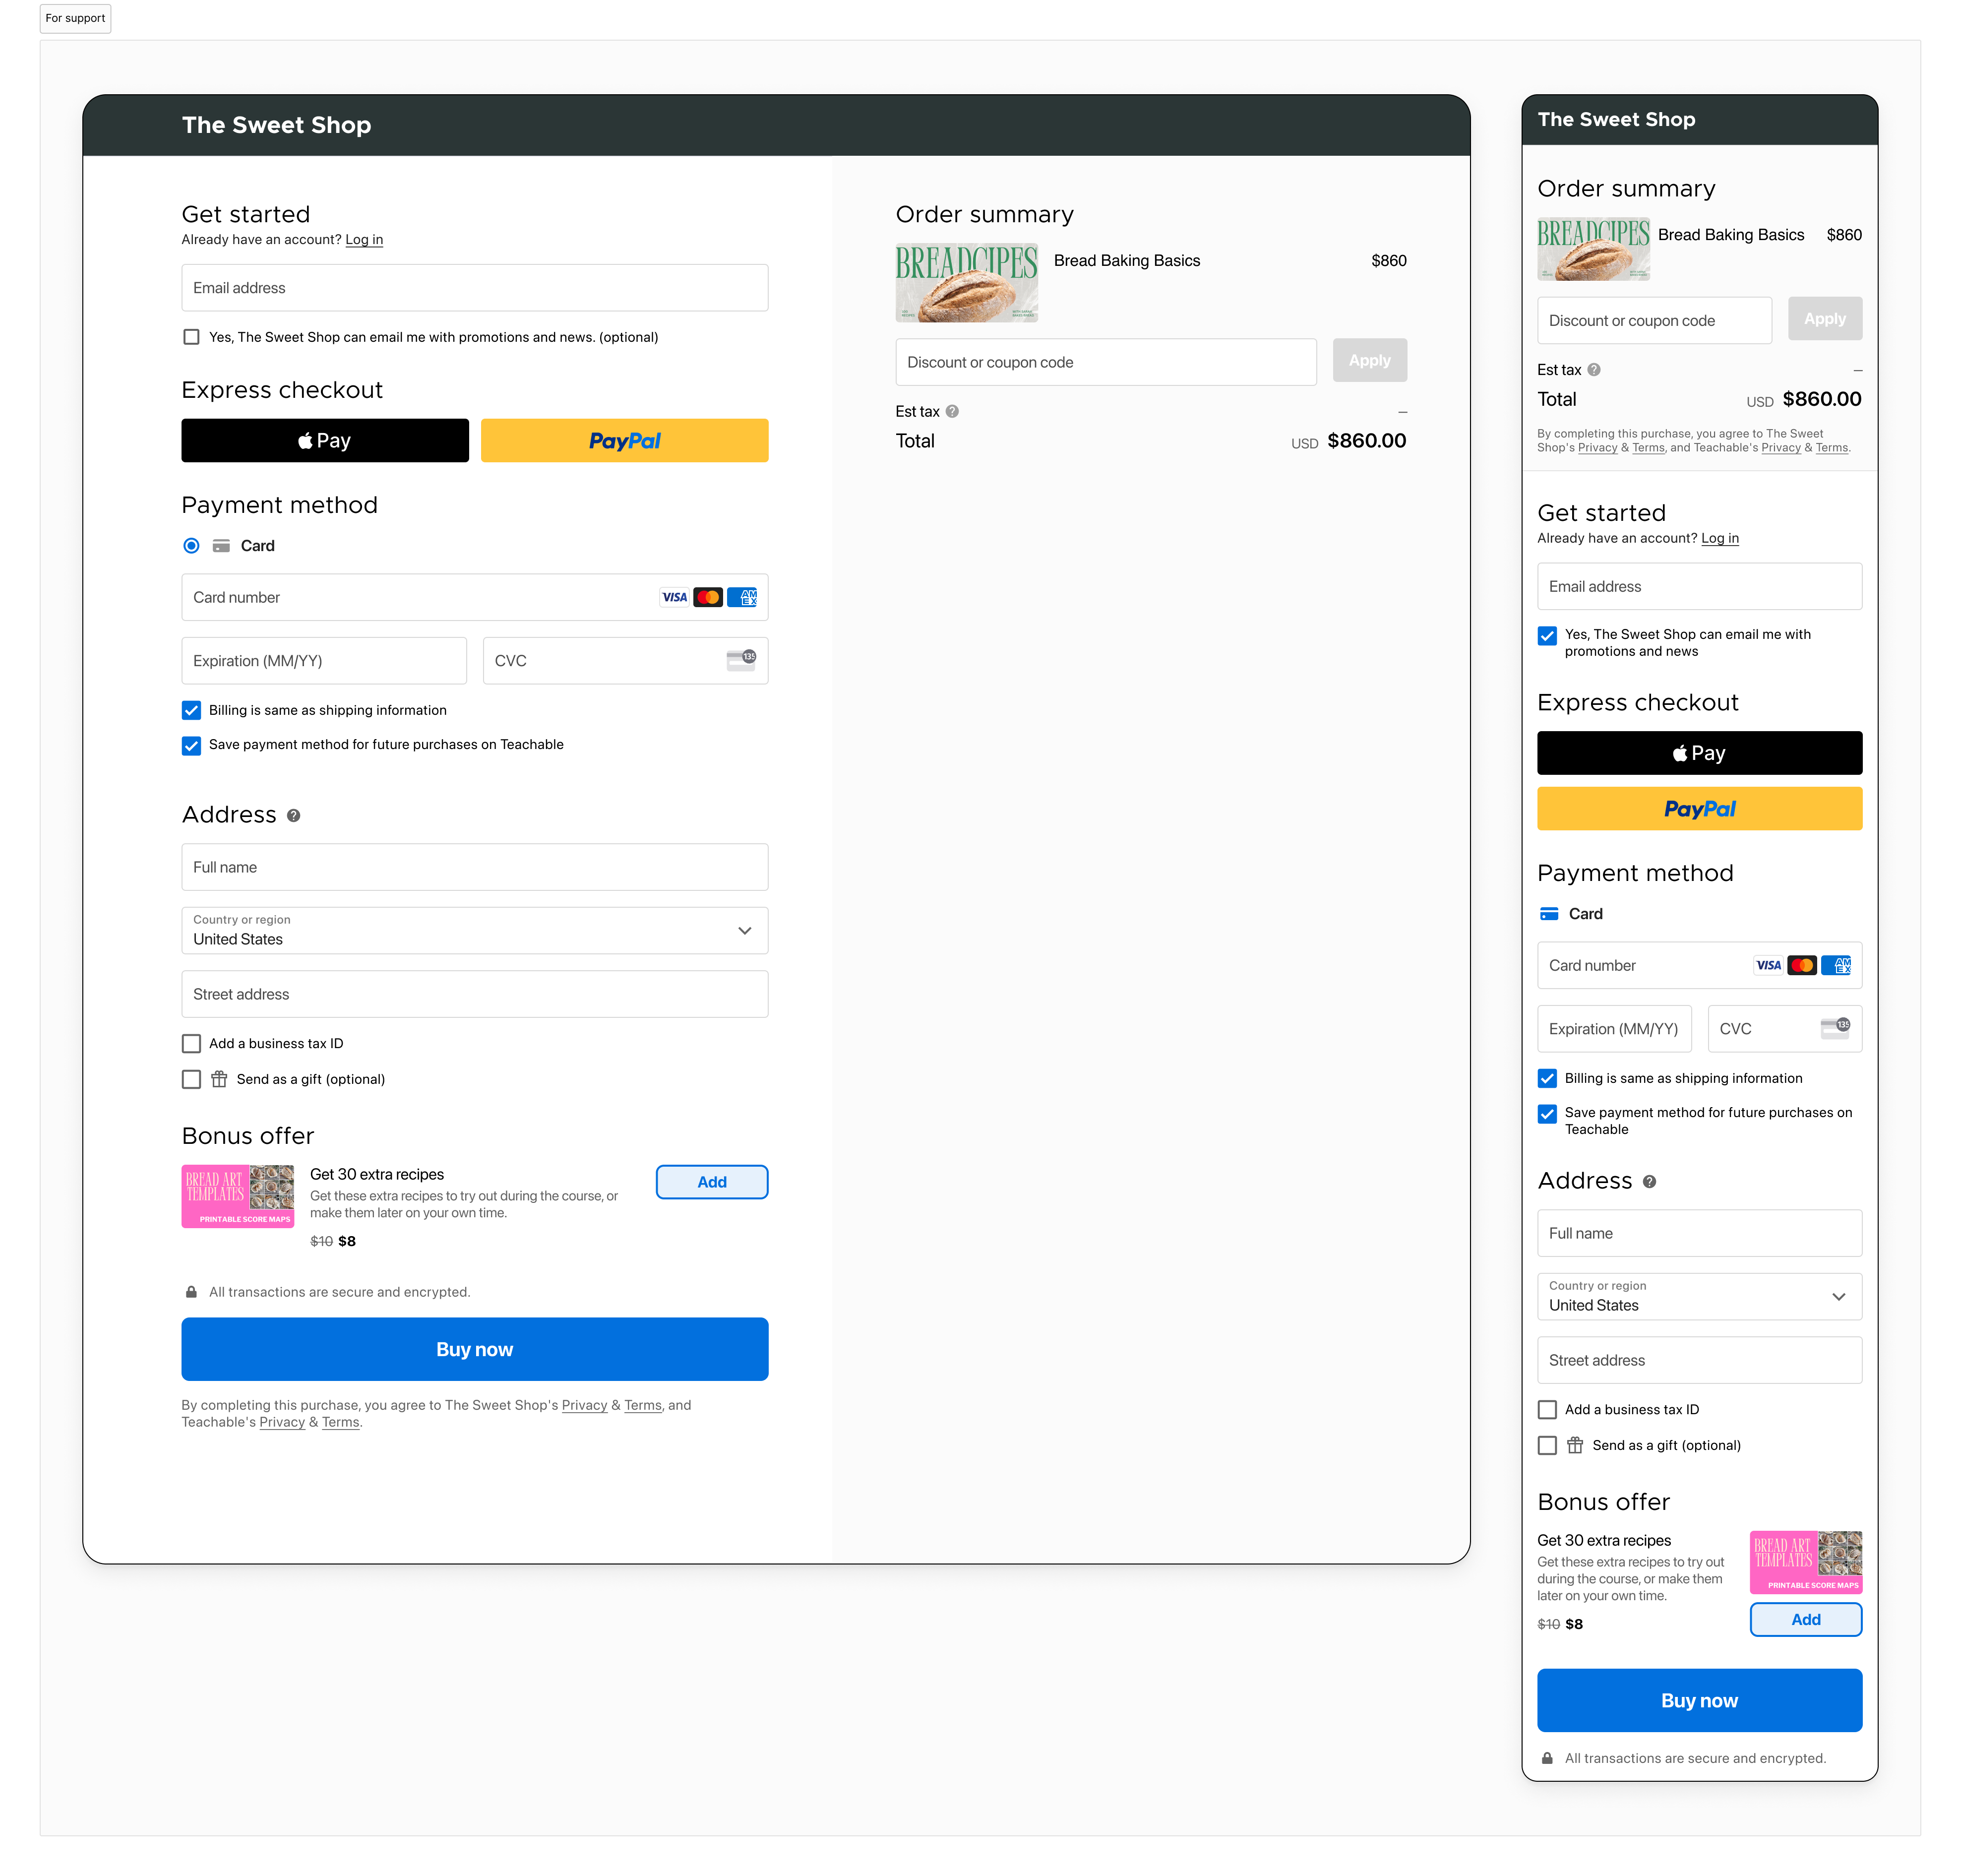
Your checkout page is where students make their purchase decisions. Even for your mock product, setting this up helps you learn how to optimize the sales experience before your real product goes live.
To edit your checkout page:
By setting up and previewing this page now, you’ll know exactly how your real checkout page will look and function before launch.
Learn more with our support guide around checkout pages.
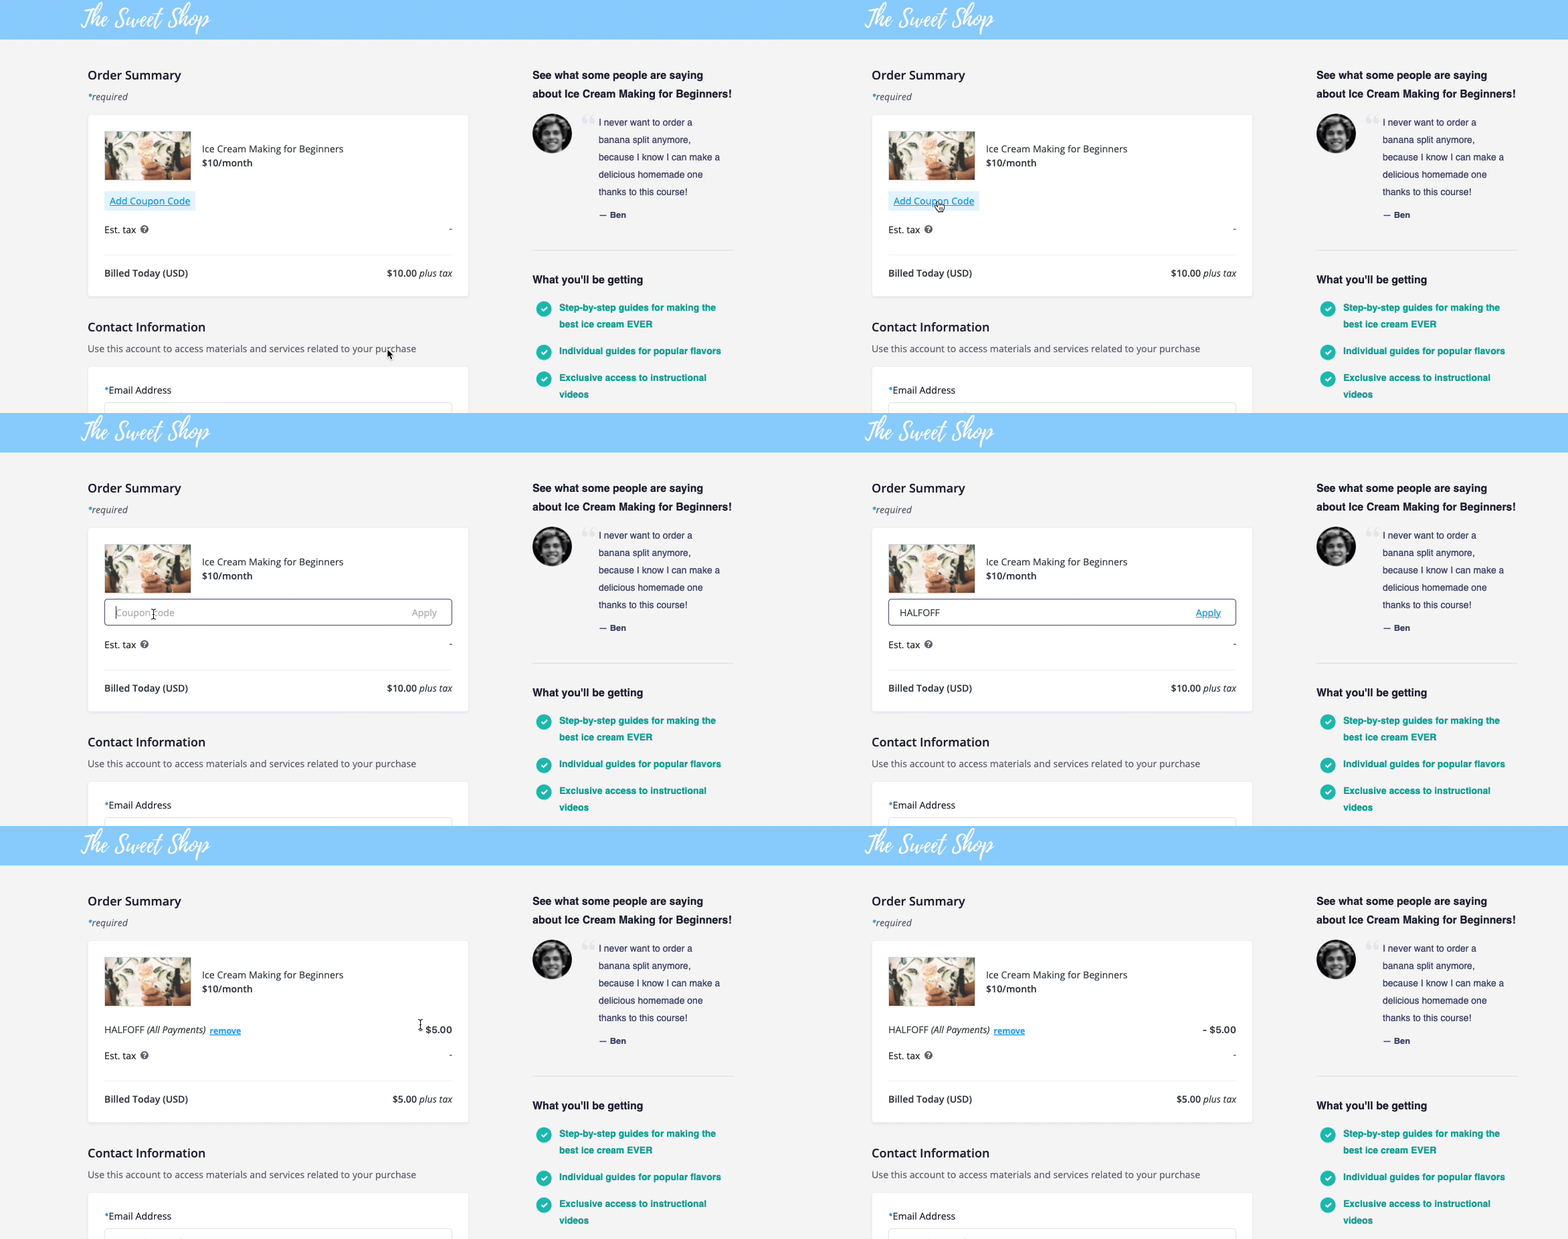
Before launching your product, run a test transaction to experience the full checkout process as a student.
We recommend testing the checkout page so it’s easy to navigate, coupon codes apply correctly, and payment processing works smoothly.
Running a test purchase will also help you to see what your experience looks like from a student’s perspective.
If you want to make sure your payment processing is functioning properly, set up a temporary $1 pricing plan and complete a purchase. Once confirmed, you can refund yourself using your Teachable admin.
Now that your Teachable school and payment system are set up, it’s time to get to the fun part: create the actual product you’ll be selling.
Whether you’re launching a course, digital download, or coaching offer, this step ensures you have something valuable for your audience.
Don’t worry about making it perfect—your goal is to get a minimum viable product (MVP) ready for your first sale on Teachable. You can always refine and add more content later.
In many cases, you can start with a rough outline before fully developing your product.
Many successful creators validate their ideas by testing, marketing, and even pre-selling their product before all content is finalized. Some have generated five-figure pre-sales before officially launching.
Here’s how you can get started in under an hour.
Choose one of the following two simple product types to get started quickly:
If you’re unsure, start with a digital download since it requires minimal setup. You can always expand into a mini-course later.
Once you’ve chosen your product type, create it inside Teachable:
For digital downloads, upload your file as a resource that students can access immediately.
Your product doesn’t need to be fully complete to start selling. Upload at least one piece of content so students get immediate value.
For mini-courses, add:
For digital downloads, upload:
To add content in Teachable:
By the end of this step, your first digital product will be fully created. Now, it’s time to develop a sales-ready publishing plan and marketing system to start attracting and selling to students.
Creating a great product is only half the equation—having a system in place to sell it is just as important.
A great sales system is more than the sum of its parts; it’s a structured way of getting potential students to understand what you offer, see its value, and feel confident about making a purchase.
Teachable provides multiple options to help you create a seamless sales experience, whether you’re looking for a quick launch or a fully customized approach.
Before you start driving traffic to your offer, you need a sales page that presents your product in a compelling way. Teachable gives you two options:
To choose the best option for your product:
Whether using a custom sales page or the product detail page, you can customize your page to the look and feel you desire.
For a quick setup, the product detail page generates a structured sales page automatically. While it does not offer full customization, it allows for:
For those who want full control over their layout, Teachable's sales page editor allows for detailed customization. You can:
A sales page is one part of the process. Teachable offers additional tools to strengthen your sales system:
These tools help increase conversions by making the buying process smoother and offering incentives to take action.
Before promoting your sales page, run a quick test to confirm that everything is working as expected:
Once these steps are complete, your sales system is ready. Now, it’s time to drive traffic and start making sales.
Having a great product and a strong sales system in place sets the foundation, but making sales requires reaching the right people and grabbing their attention. Whether you already have a following or are starting from scratch, there are multiple ways to promote your product and attract buyers.
Getting the word out early can help you generate momentum before your official launch. Share your offer across different platforms to warm up your audience:
If you don’t have an audience yet, consider reaching out to peers, past clients, or industry contacts who may be interested. Partnering with a micro-influencer or affiliate can also help expand your reach.
A pre-sale allows you to start selling before your product is fully completed. This not only helps generate early revenue but also provides valuable feedback from students before your official launch.
To run a pre-sale:
Not everyone buys the first time they see your offer. A structured follow-up system can turn interested leads into customers.
Here are some of the marketing moves you can take to convert more of your audience into customers:
Once sales start coming in, monitoring performance helps identify what’s working and what needs improvement. Teachable’s Sales Analytics Dashboard provides key data points to help guide decisions.
With this data, adjustments can be made to sales pages, pricing, and promotional strategies to improve sales outcomes. Teachable’s analytics tools make it easy to track progress and refine marketing efforts over time.
Launching a digital product doesn’t have to take months of planning, expensive software, or complicated tech. With Teachable, everything you need is in one place—from setting up your school and accepting payments to building a sales system and tracking performance.
By following these five steps, you can turn an idea into a live, revenue-generating product in a matter of days. Whether you’re starting from scratch or expanding an existing business, Teachable gives you the flexibility to monetize your expertise on your terms.
Now, the next move is yours. Set up your Teachable school, start creating, and take the first step toward building a new income stream today. Start for free and see how quickly you can launch.

We know we’ve got some Teachable-specific terms that we refer to. And while we try to be accessible as possible, it can be helpful to have some clarity on what we really mean when we say referrals, upsells, or order bumps.
To help you make sense of it all, we created a Teachable terms glossary for you. Refer to it during webinars, while you’re going through teachable:u, or while you’re reading another blog article. Our goal is to help answer as many questions about our specific terms as possible.
Enter your email below and get immediate access to the glossary.
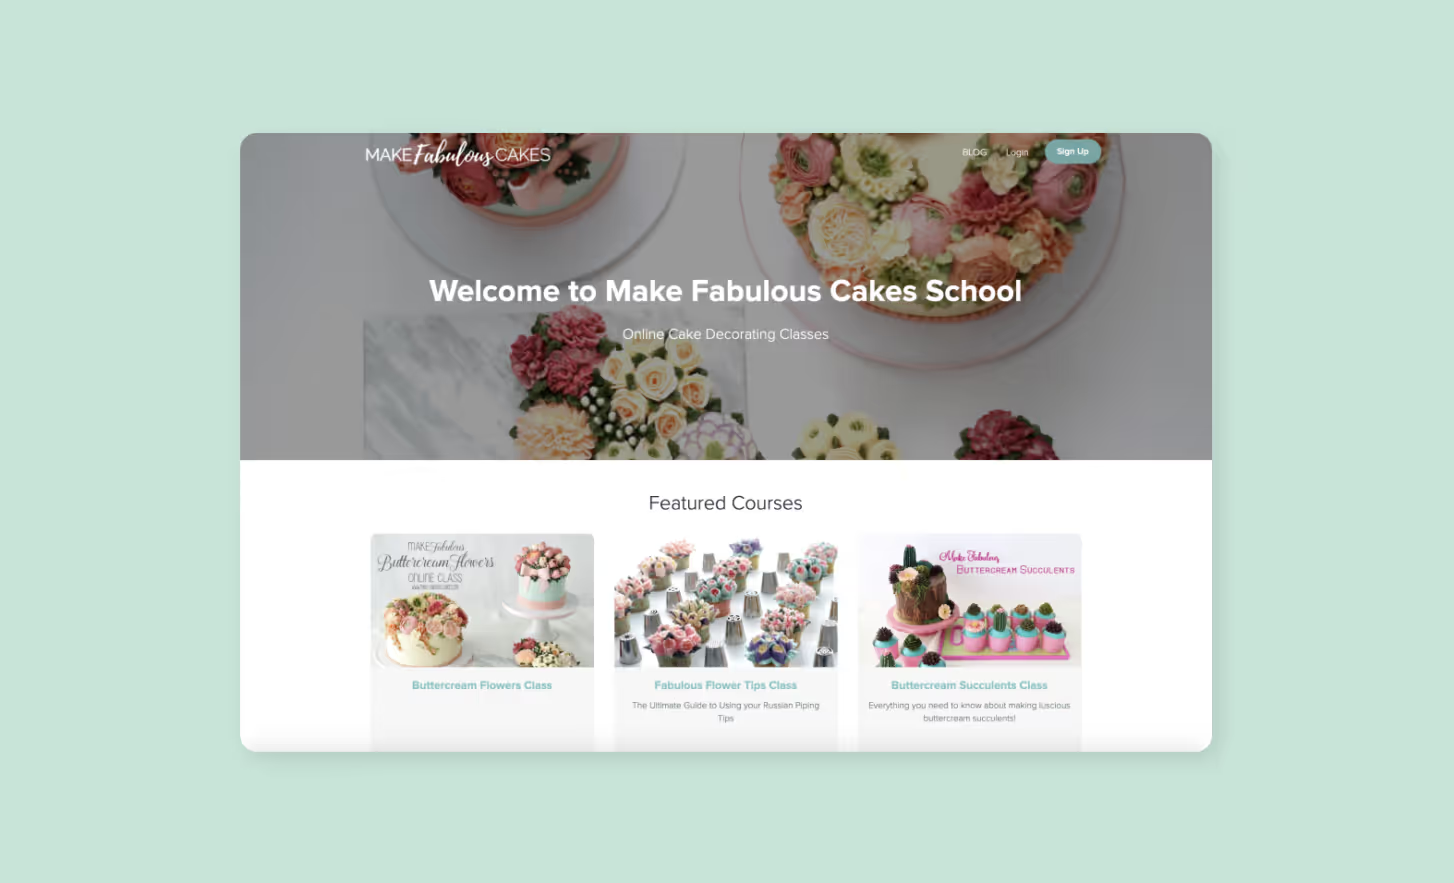
Teachable is your home base to create, market, and sell online courses. With a Teachable subscription, you can host and deliver your course content, process payments and student enrollments, and get help with your taxes and finances. Teachable gives you the tools to provide your students an engaging, intuitive learning experience without the administrative headaches.
Before we dive into how to upload your course content, create your sales page, and set up your payment gateway, let’s start from the beginning of your course creation process: creating your homepage.
As an online business owner, chances are you have a core business you’ve developed over the last few years and a website you’ve dedicated hours to building. Now, you want to expand your business with online courses.
If that sounds like you, keep reading.
To illustrate the steps involved in building your homepage, we’ve created an example we’re calling Teachabrand—a made-up brand consulting business. Using this example, we’ll show you how an established brand should set up a homepage.
Let’s assume the creators of Teachabrand already created a main brand website (teachabrand.com). They hired website designers and developers to build it for them, and it’s the page with which most of their audience are already familiar. The Teachabrand team wants their consulting work to remain the focus of their website. So, instead of confusing their consulting clients by creating another website, they set up a custom subdomain: courses.teachabrand.com. Here, they can host the online courses portion of their business.
Here’s how to set up and connect a custom subdomain:
If you don’t want to create your own custom subdomain, Teachable offers a standard subdomain (example.teachable.com) to all members for free. If you want to connect a custom root domain (like teachabrand.com) directly to your school, here are more advanced steps to guide you through the process.
Now that you have your course subdomain all set up and pointed at your Teachable site, let’s do some additional customizing. Your homepage will use the default page template that comes with any Teachable account. However, you can change what your homepage is by going to Site > Navigation in your school.
Under Homepage Settings, you have the flexibility of choosing what your audience sees based on their logged-in state. Choose among:
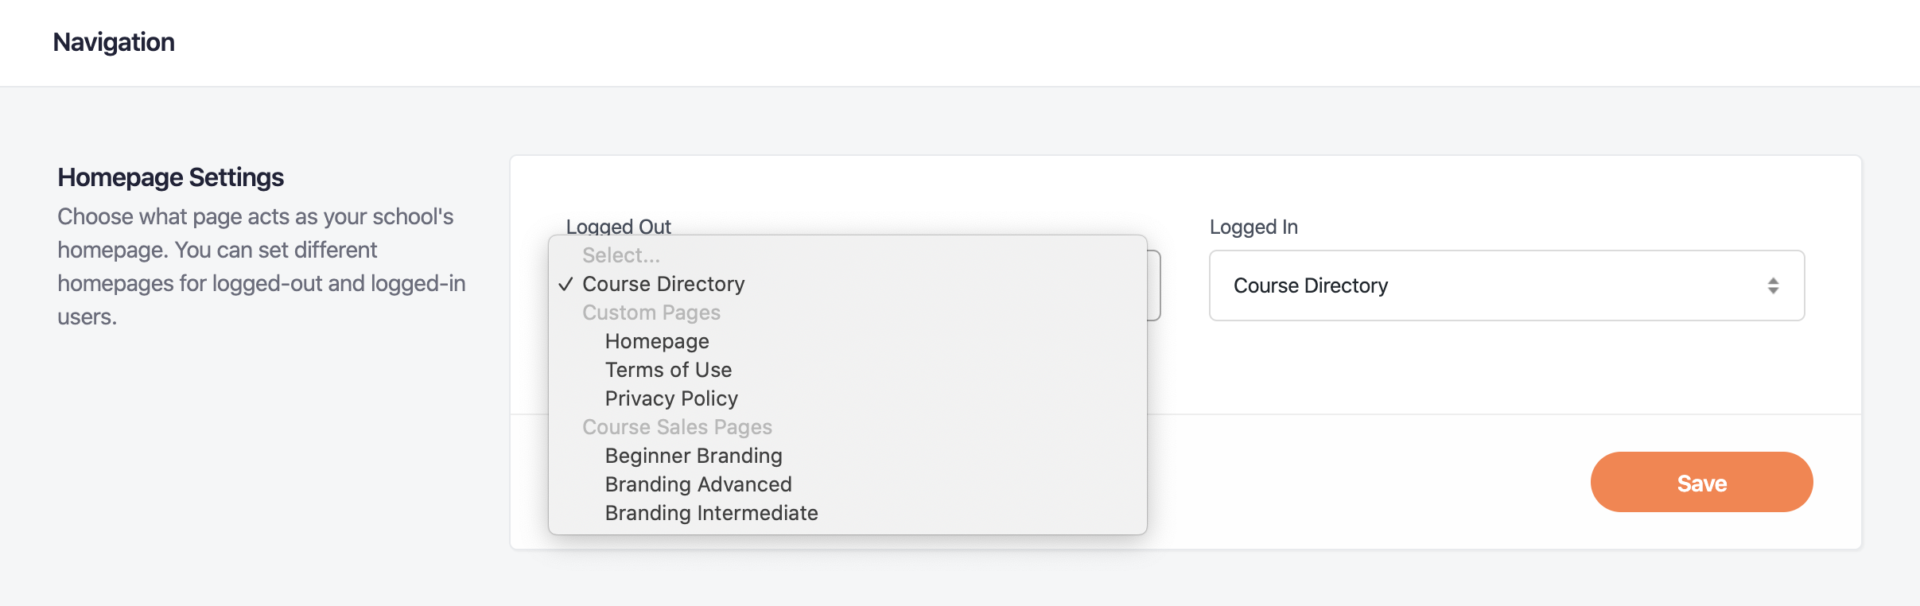
Take courses.teachabrand.com. The homepage is set to the course directory, so the audience can see the full list of courses that are available. If you’re still developing your course content, you can create a simple custom site page as a landing page to let your audience know your courses are coming soon.
Much like Teachabrand did, think of Teachable as an extension of your website and your business! In both teachabrand.com and courses.teachabrand.com, the navigation is customized to help customers go back and forth. While it’s definitely not necessary, depending on your audience, it can be a helpful guide.
Here’s how you can customize your navigation:
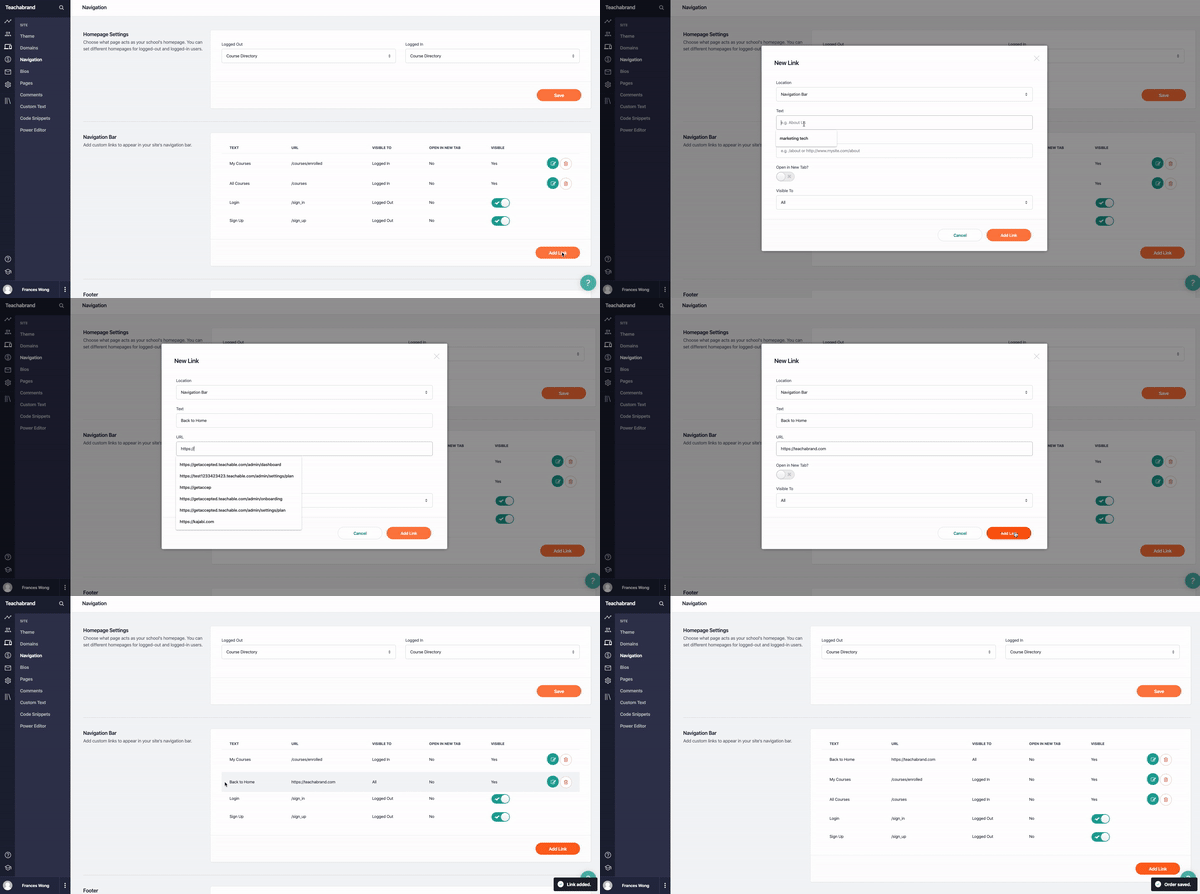
Now, you have your Teachable homepage connected to your main website.
If you’re starting your online business with Teachable and do not have an existing website, we have you covered. On Teachable, your homepage functions as your main website, so you don’t need to purchase other web-hosting platform subscriptions.
Your homepage serves two main purposes: The first is to share who you are, and the second is to serve as a storefront for the courses you’ll be offering.
Every Teachable site comes with a default templated homepage to help you get started. To edit and customize the page, you’ll use blocks to upload a variety of content to your page—such as text, images, buttons, etc.
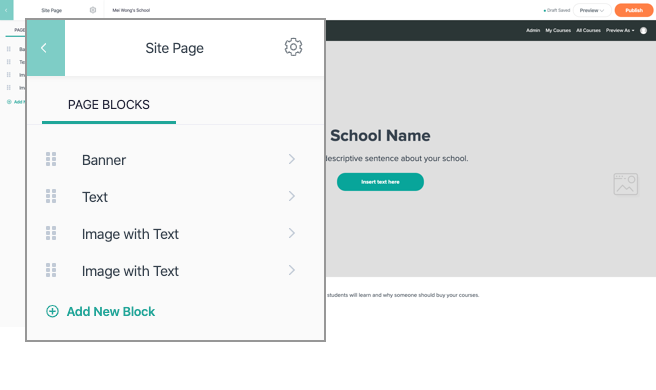
Under Admin > Site > Pages, the template comes with the following page blocks already added:
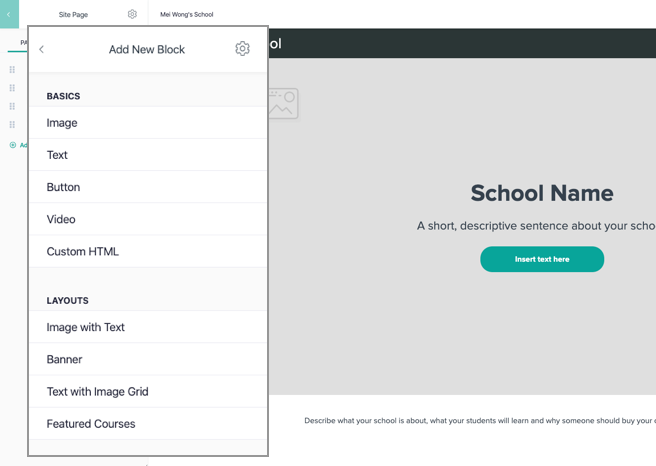
You can edit these blocks by uploading your brand assets, description, and information. If there are any content blocks you don’t find useful, you can delete them. If you want to further customize your homepage, you can add these blocks:
Here is a demo on how to build your Teachable homepage:
Your brand is your business. That’s why we made sure that you’re able to fully customize the look and feel of your homepage with your business logo, fonts, and color schemes.
Here’s how you customize your site-wide designs:
Once you’ve made these edits, go back to Site > Pages to access your courses homepage and preview the changes you’ve made.
Before you go live with your homepage, there are a few final things to do. In the page editing experience, you’ll notice a gear icon on the top right of the editing column; clicking that will take you to your page’s settings. From there, you can edit:
Before you go live, make sure everything looks the way you want it to. To check this, go to Site in your school and hit Preview. Once you’re ready, hit Publish.
{{homepageguide-component="/blog-shortcodes/blog-popup"}}
Now your homepage is all set up. There is no one way to do this, so do what feels right for your business and online courses. If you have any additional questions on how to set up your domains or page, here are additional resources to help you.
When you’re ready for the next step, here’s how you can set up your product sales page.
Get your business off the ground by creating and selling your coaching services. Coaching can be a valuable first product that builds your business or validates a course idea. It can also be a powerful partner to online courses. Whether you’re looking to move your established coaching program to Teachable or validate a course topic you’ve been pondering, we have the tools to support you.
We’ll walk you through how to create your first coaching product on Teachable and the different ways you can integrate it into your knowledge business.
Coaching is one of the two digital products you can currently offer to your students on Teachable. You can be a certified coach, software expert, tutor, or anyone with knowledge and experience who wants to help others in a one-on-one setting. With coaching, you have the opportunity to dig deep into what you know and tailor your lessons to an individual client. You also have the flexibility to package your coaching offerings in different ways—hourly, time-based, or via a membership. The choice is yours: It all depends on what type of coaching service you’re offering and who your audience is.
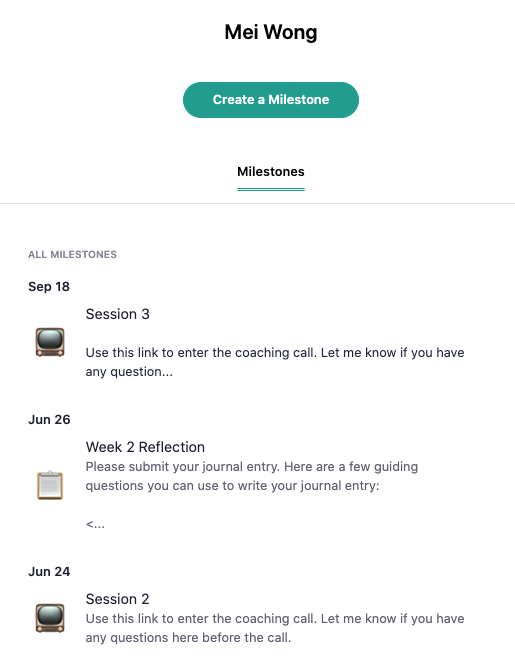
We’ve seen our creators use our coaching product in three main ways:
These are typically one-off sessions anyone can purchase to get a 30-minute feedback, consulting, or training session with you. This is typically created and offered to existing clients. You don’t need to put too much effort into selling these sessions because your audience already knows who you are and the expertise you offer.
For example, if your course is on starting a blog, you can offer quick consultations for keyword targeting strategies. Or, if you offer a writing course, you can offer feedback sessions during which you go over areas your client can improve in.
These are for topics that require a longer coaching relationship between you and your client. This might include four-week or even three month long coaching programs. For example, if your topic is on nutrition or accountability coaching, one session might not be enough to help you make the transformation for your client.
This is a little bit of a combination between the first two examples above. With experience, you bring additional value to your clients and eventually, you only have so much time you can offer one-on-one coaching. That’s when you charge your coaching product at a premium price (over $1,000) and require an application before you accept them as a new client. This ensures that they are committed to this transformation.
To create your coaching product, there are three main components you need to consider—how to accept clients, how to price your coaching package, and how to welcome your clients.
Coaching requires your dedicated attention and time, so it’s important to think about how you want to accept new coaching clients. On Teachable, we call the process of onboarding new clients the client intake flow. There are three different intake options you can choose from:
You can set up your client intake flow however you want. The choice is yours. The best intake option for your business depends the type of coaching product you’re offering and how much of your time you’d like to dedicate to selecting coaching clients.
When you’re crafting your package and price, you want to make it easy for your audience to say yes. Give your audience different options to choose from and make it clear what they can expect from each pricing plan.
By adding a free pricing plan, you are offering your coaching product to interested clients for free. There is no cost, but they’ll need to sign up for an account with your Teachable site to access your shared coaching space.
Free coaching sessions are often used to set up sales calls for other products or services you offer. It can also be used as a discovery call to get them to sign up for your coaching product. It allows prospective clients to get a little more comfortable with your coaching style, learn more about you, and get a peek at what you’re offering.
With one-time purchases, clients can access your coaching product by paying a singular amount. This is most commonly used for single sessions to offer your expertise. For example, you can offer a one-hour session to provide design feedback on a website. Or, if you’re a blogger, you can arrange a session with your prospective clients to help them plan and research their content calendar.
You can also use this pricing plan option to offer a coaching program that runs over several days or weeks (or however long you want to run it). Clients will pay an upfront fee for the coaching program you’re offering. Make sure you’re clear about what they can expect during this time frame—number of sessions, frequency of sessions, duration of each session, and anything that might be important.
Subscription pricing for coaching might be best used for coaching packages where you’re put on retainer. This means that as long as your client is paying for the subscription they can set up coaching sessions with you—how many and how often is still dictated by you!
You can also set up longer coaching programs using a subscription pricing model. Keep in mind that your clients can cancel before the program is over.
When you offer a big coaching program like an eight-week program, you’re likely to sell it a higher price. It’s a larger commitment for you and it’s likely structured to best support your client’s transformation. Some of your audience might not be able to pay the full cost up front, which is why it’s nice to have the flexibility to set up a payment plan for them. If your coaching program, for example, is eight weeks long, you can set up a payment plan of two smaller payments over the eight weeks.
Pro-tip: You can create more than one pricing plan for your coaching product. It can help you incentive your prospective clients to choose the one that offers a better deal. It can also help you test out which pricing plan option attracts your clients best.
You have the option to display a welcome message in the one-on-one private coaching space you share with your client on the enrollment date or on a fixed date. It is most common to use the enrollment date, as a fixed date is for more specific classes or webinars you might be offering.
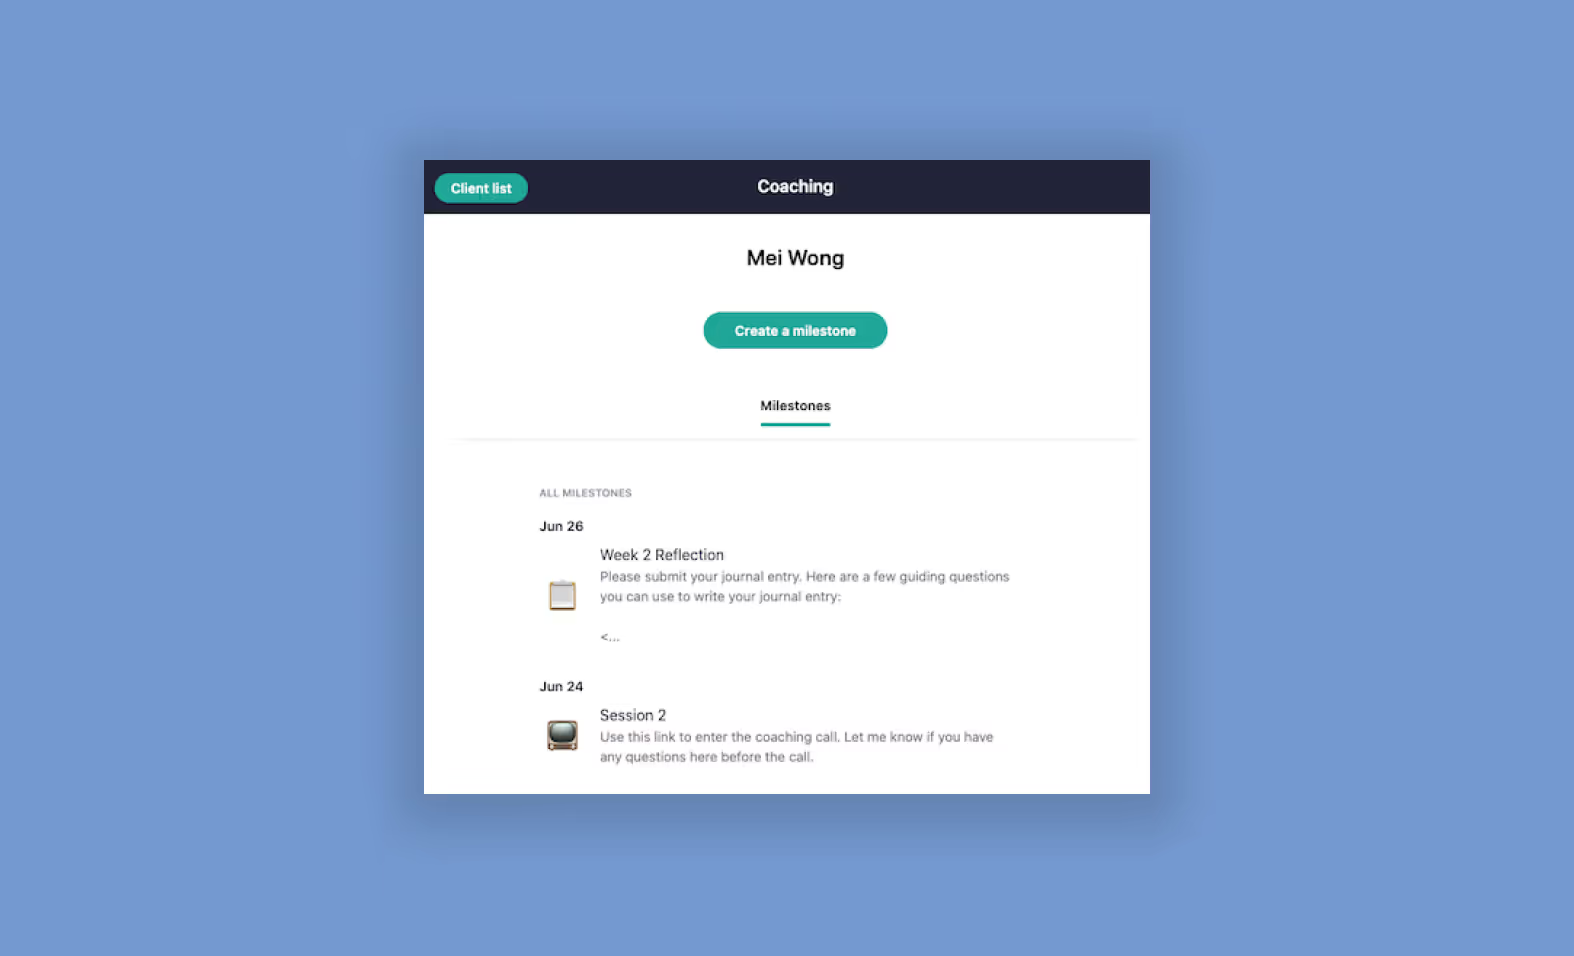
To create this welcome message, you’d create the first milestone. Milestones can be tasks, action items, check-in points, schedulers, or just a scheduled event. For the first milestone, many creators use it to welcome their clients, give them instructions on next steps, and reveal what they can expect.
These three key steps are what you need to create your first coaching product. It only takes five minutes to create your first product. Here’s a demo:
We’ve created a user experience that best matches how coaches reach and acquires a new client. That’s why every time you create a new coaching product, it auto-generates four pages:
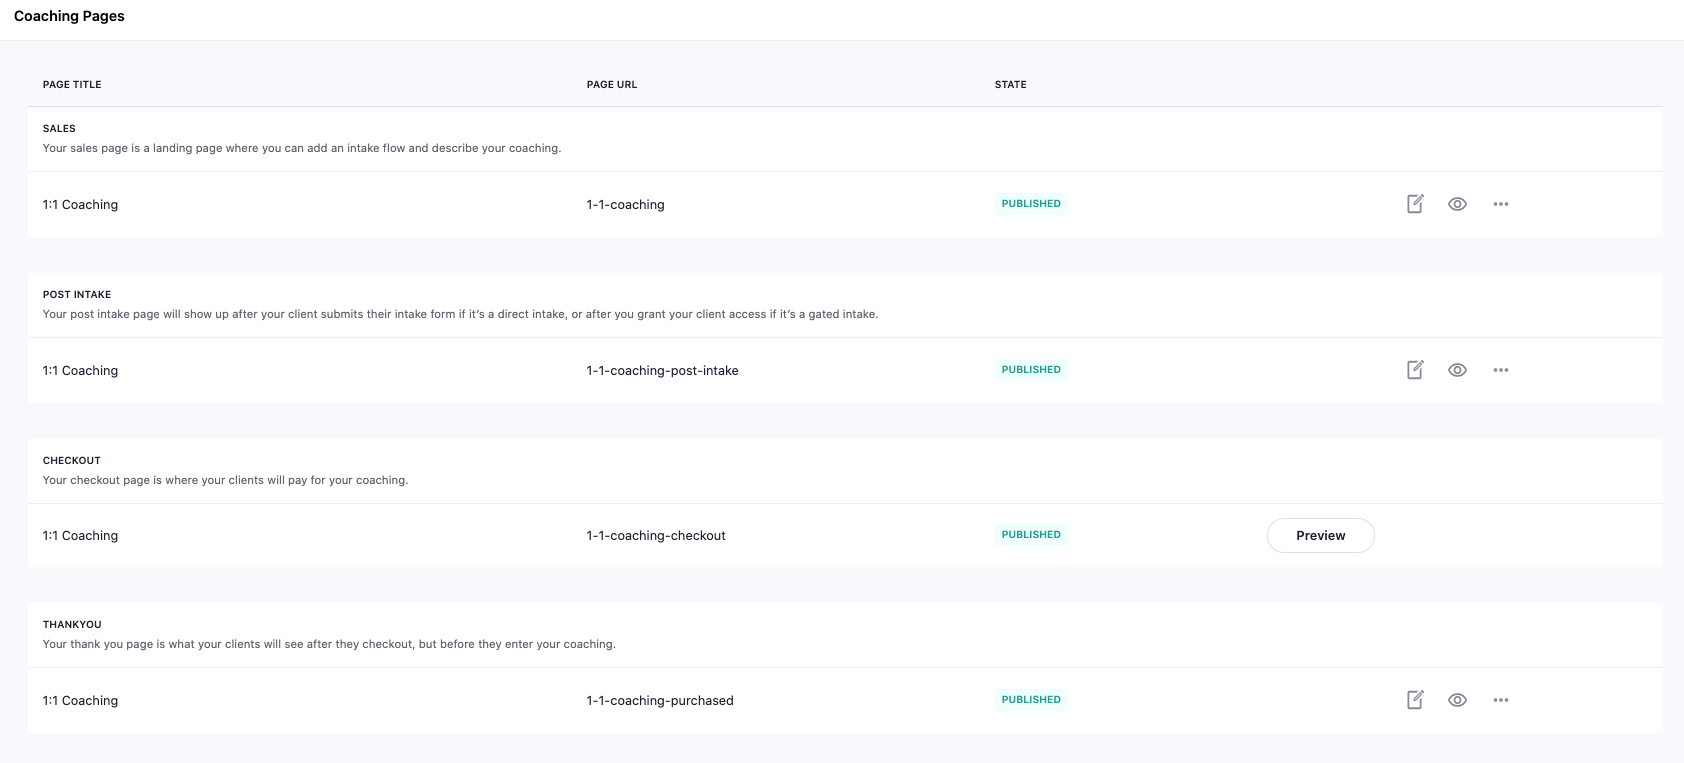
It’s important to customize your pages to have the right messaging, offer and branding to optimize conversions for your product.
Once they’ve purchased your coaching product, they land in your one-on-one coaching space where they’ll see your welcome milestone. If it is a quick consult, that might be the only milestone you need. On the other hand, if you are running a long coaching program, you may require check-ins, assign tasks, and schedule follow-up sessions.
Instead of relying on tagging each client individually in your inbox, you can use milestones in the one-on-one coaching space on Teachable. To keep track of your progress with your coaching clients, you can use milestones to create:
Create a milestone and share instructions in the description on what the assignment is and how they can complete it. You can either set the date to when you assign it and include when it is due, or you can set the date of the milestone to when the assignment is due. If you have worksheets or workbooks, you can upload it as a message for them to download.
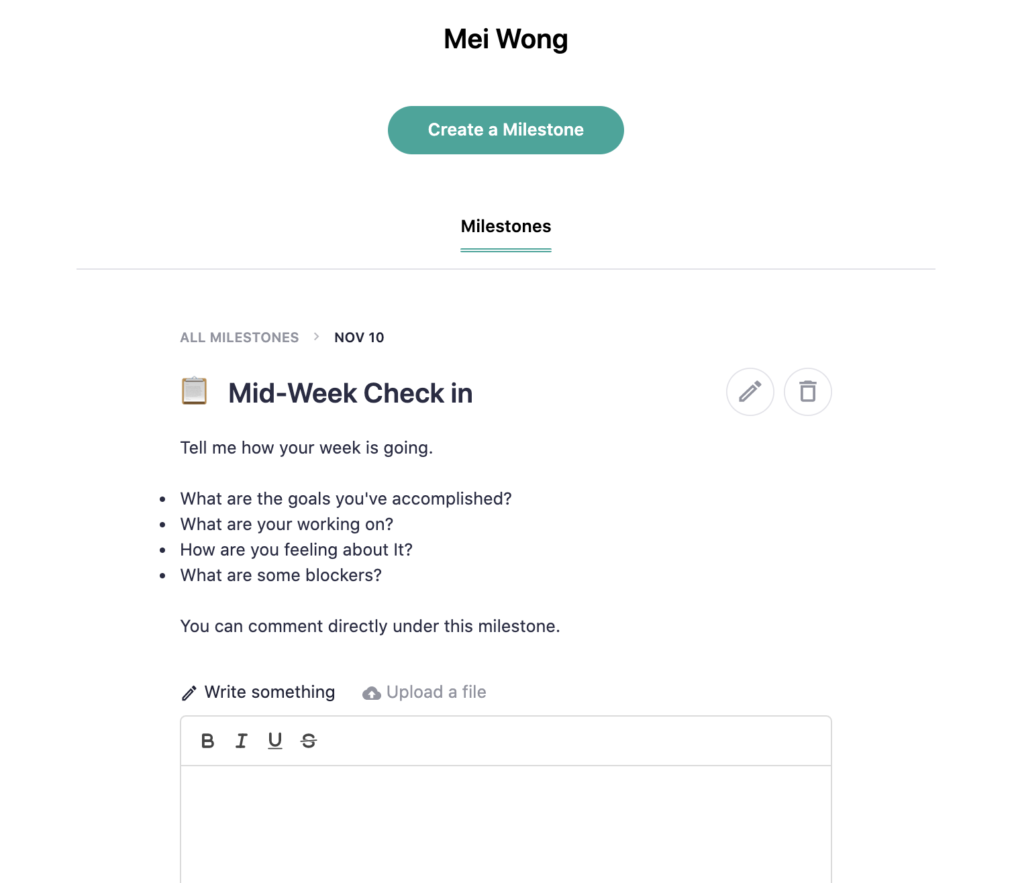
Similarly, you can create a milestone for a client to check-in with you. This asks them to drop down their thoughts, progress, or anything else you’d like for them to journal. This is typically used between sections, so you and your client can track their progress.
The client can submit their entry directly under the milestone as a message. Once they have completed this entry, you’ll receive a notification and can respond directly in the private space as well.
You can create a milestone with your availability scheduler so your client can immediately pick a time that works for them without needing additional back and forth emails. While you can use any scheduling link of your choice, we have a native integration with Calendly.
With a paid Calendly account, you can add in an API key to your Teachable account, and any scheduled meeting created using the scheduler will automatically create meeting milestones. These meeting milestones will include the title, description, and Zoom link.
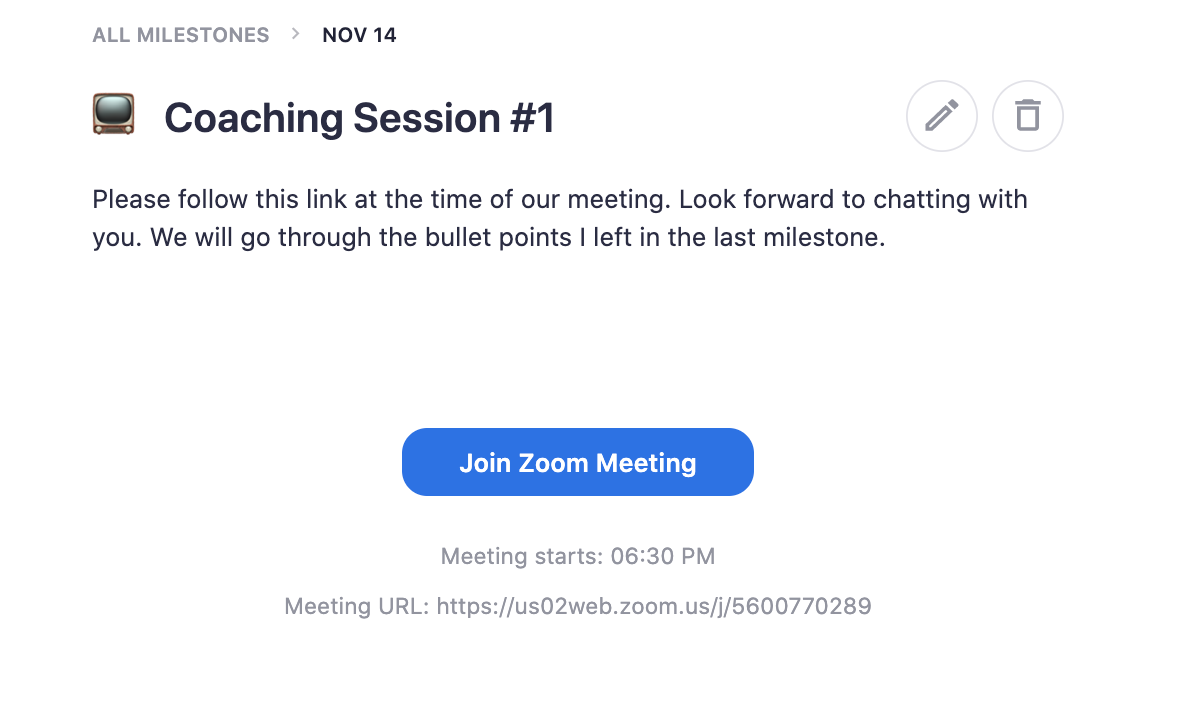
Meeting appointment milestones are straightforward—the meeting milestone will indicate the date, time, and where (via a video conference link) the meeting will take place. At the time of the meeting, your client will just have to click on the button and it’ll take them to the video conference link to meet with you.
Keep in mind that you can save all of these recurring or commonly used milestones as a template. Once they are saved as a template, you can reuse them at any point for any client. Here’s a demo on how to create your milestone and save the template:
If you want to keep your coaching product a little more exclusive, you can keep it hidden, which is the default state. This means that people can only access the product and purchase if you give them the link to the sales page or check out page directly. If you want to offer this coaching product to any one who visits your site, you can hit the “Make visible” button and it’ll immediately be available under your directory.
{{coursecurriculum-component="/blog-shortcodes/blog-popup"}}
Now your coaching product is all set up. There are many ways to do it. Whether you are a certified coach offering coaching on a specific topic, or you’re just an expert providing mentorship, our coaching product can help you fulfill that. If you have any additional questions on how to set up your coaching, here are additional resources to help you.
Next up: Set up your sales page on Teachable and start marketing your new coaching product.

The bulk of the work to create and publish your course comes from writing your course content, filming your video lessons, and developing PDF workbooks. Uploading it to Teachable is the easy part. After all, that’s how we support you in monetizing your expertise. Now that you’ve created your homepage, we’ll walk you through how to upload all your hard work onto Teachable seamlessly so you can get ready for launch.
Your courses are the main product you offer your audience. Each one is unique and can come in different formats and sizes like a mini-course, a standard course, or a flagship course. Flagship courses range from those that can be completed within a day to courses that take three to six months to complete. Similarly, courses also come in different styles, such as video-based or text-based courses. The choice is yours. That’s why we give you the option to customize your work when you create and publish your course.
Think about your curriculum and how you want your students to progress through your course. At Teachable, a course is made of sections and lessons.
Sections contain groupings of lessons. And lessons are structured, informational units composed of text, files, video, and images. (Trust us, understanding this will be instrumental before you put in the effort to create and publish your course.)
For example, in the test course we created below, you can see there are two sections: Research 1.0: The Past, and Research 2.0: The Present. You may also refer to them as modules or chapters of a course. Here, lessons are used to break down the larger research theme. So the audience can learn about the different types of research they need to do:
You may have used Google Drive, Microsoft Docs, video files, and PDFs to create your content. Teachable allows you to upload your content from:
In whichever platform you’ve used to develop content, rename and organize them by Section1-Lesson1. This will make the upload process much easier. And make sure your file types are in the recommended sizes, file types, and resolution:
Video
Images
Audio
All organized and ready to create and publish your course? Now it’s time to upload. So head over to Course > Curriculum in your school admin. Here’s how you can upload your course in a few minutes:
.gif)
Repeat for all the sections you have in your course until you’ve uploaded your entire curriculum. You can preview your course by hitting the preview button. And you’ll be able to see how your students would interact with your course and if the order that you’ve set makes sense.
If there are things you want to move around, you can drag and drop lessons within their section, as well as move them to a different section.
{{coursecurriculum-component="/blog-shortcodes/blog-popup"}}
Within each lesson you’ve uploaded you’re able to add additional content to provide more instructions and a description of what that lesson includes. Here are the additional content types you can add to your lessons:
.gif)
If you’ve written any of your course content out, you’ll want to copy and paste this content into the relevant lessons. Any uploaded Google Doc or Word document will be uploaded as a file available for download. So, if you prefer the text to appear in the lesson itself, you’ll need to bring that content over by copying and pasting.
Once you’ve added the text, you can drag it above or below the file you’ve already uploaded. But if you’d like to create a new lesson with text only, you can do that too.
.gif)
If you need, you can easily embed a video or a survey in your lesson. You can click on the Add Custom Code tab and insert the code you already have. Again, once you’ve added in the code, you can drag it above or below the file you’ve already uploaded.
If you want your students to engage with each other and ask you questions, you can enable lesson comments. Find the lesson you would like your students to share their thoughts on. Click into that lesson, scroll to the bottom, and toggle the Comments button on.
Here’s how you can use lesson comments in your course:
To respond to the comments you have in your course, you’ll find all the comments in Course > Comments. And you can also customize the comments settings in Settings > General:
Not all the files you’ve uploaded via bulk upload will be available for download by default. But the exception is Word documents which are automatically made available for download.
If you want your PDFs, videos, or audio files to be downloadable, make sure you select the download icon. Once enabled, it’ll appear green. You can also select all the lessons you want to make downloadable and toggle the download setting for all at once.
Teachable provides basic multiple-choice quizzes within the lesson editor. On the Pro plan and above, you’ll be able to offer graded quizzes to test how your students are doing. These quizzes are designed so that students will only have one chance to take them. All scores will be saved and factored into your quiz reports.
To boost your course’s credibility, you can also award native completion certificates. Navigate to Course > Certificate, and you can create your own certificate with our templates or by using Liquid/HTML.
Demo-Certificates of Completion
A course completion certificate itself can be a milestone your students work toward. And as an instructor, you might also want to add additional challenges to make a certificate more valuable.
Use course compliance to enforce lesson completion, enable video compliance, and require quiz scores to validate student progress and meaningfully reward their accomplishments. To enable course compliance, navigate to Course > Information > Course Compliance.
You’ll have the option to:
{{firstcourse-component="/blog-shortcodes/blog-popup"}}
You’ve done the work to create and publish your course. And now you’re ready to go live. Be sure to preview the course curriculum before you publish your course. Navigate to Course > Information and select the Curriculum tile to see your entire course laid out. Take the time to go through your entire course and ensure it’s the experience you want your students to have. And when you’re finally ready, hit Publish.
You’ve set up your first course on Teachable. Next up: Create your sales page and set up your payments.
.avif)
Integrating Teachable with WordPress opens up a world of possibilities for content creators and online educators.
While Teachable excels at hosting and delivering courses, WordPress remains the go-to platform for building versatile websites. In fact, data shows that over 500 sites are created daily on WordPress, whereas competitor platforms like Shopify and Squarespace see an average of 60-80 new sites per day.
Many course creators find themselves torn between Teachable's robust course management features and WordPress's flexibility.
The good news is, you don't have to choose.
Combining these two powerhouses allows you to leverage the strengths of both, creating a seamless experience for your audience. With the right approach, you can use Teachable's specialized e-learning tools alongside WordPress's extensive customization options and vast plugin ecosystem.
This guide will walk you through the process of integrating Teachable with WordPress.
The Teachable WordPress Plugin is a powerful tool designed to seamlessly integrate Teachable courses and products into WordPress websites. This plugin allows creators to display their Teachable offerings, such as courses, bundles, and memberships, directly on their WordPress site.
It allows you the ability to add product information without duplication. This ensures that any updates you make on Teachable are automatically reflected on your WordPress site. This synchronization is managed through an API key that helps keep course details, pricing, and enrollment information current.
The plugin supports various display options, including custom blocks that can be added to pages and posts using the Gutenberg editor. These blocks can showcase product names, descriptions, images, enrollment counts, and pricing plans, all while maintaining the site's overall design aesthetic.
Additionally, the Teachable WordPress Plugin seamlessly integrates with Teachable’s secure checkout system. This allows students to purchase courses directly from the WordPress site without being redirected — enhancing the user experience and potentially increasing conversion rates.

The plugin also allows you to match the appearance of their course pages with their WordPress site's theme, ensuring a cohesive brand presentation. This flexibility extends to color schemes and layout options, making it easy to create a visually appealing and functional online storefront. The plugin also supports third-party integrations, enabling enhanced functionality and streamlined workflows for marketing, analytics, and customer relationship management.
The Teachable WordPress Plugin simplifies the entire process of managing online courses, enhances marketing efforts, and provides a seamless experience for students. It also maintains the flexibility and customization options that WordPress users expect. In the end, you might find that using WordPress with Teachable is less unnerving than migrating from it.
{{pricing-component="/blog-shortcodes/blog-cta"}}
Integrating Teachable with WordPress lets you sell and manage your courses directly from your WordPress site. Teachable offers customizable sales pages, affiliate programs, email marketing, and detailed analytics. On the other hand, WordPress provides easy, no-code page manipulation and quick reversion of changes, making it the perfect CMS for publishing content.
This integration combines Teachable's course management tools with WordPress's flexibility, making it effortless to use both platforms together.
Here’s a detailed, step-by-step guide to help you set up this integration smoothly.
To complete the process, you need to install the Teachable plugin and then connect your Teachable account to your WordPress site. This connection is established via an API key, which ensures that your course information is synchronized between Teachable and WordPress.
Once you have the key, now go to your WordPress website.

The Teachable WordPress plugin integrates your products into your WordPress site, eliminating duplicate entries. It also connects to Teachable’s secure checkout system so you can start selling courses immediately.
With the plugin installed and connected, you can now add Teachable content to your WordPress site. This step involves creating new pages or posts and embedding Teachable courses using custom blocks.
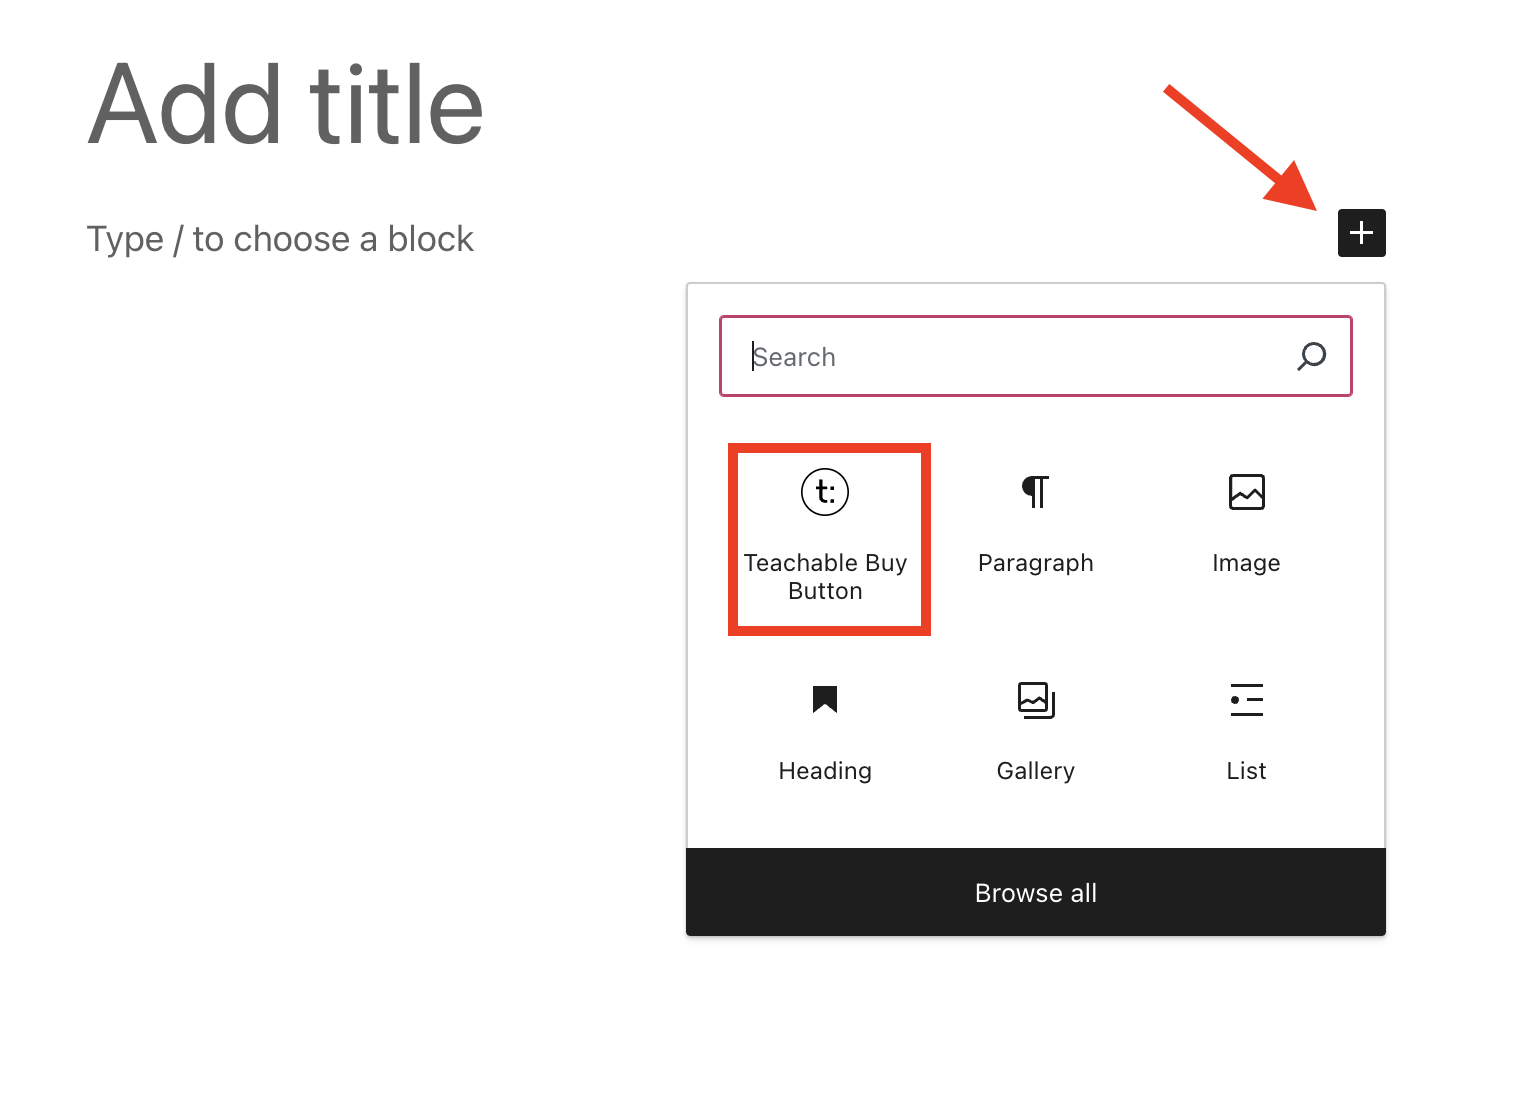
Note: Teachable products will automatically sync with WordPress on a daily basis. If you need to see updates sooner, you can manually sync them by clicking the ‘Sync Now’ button in the Sync Data tab.
If you make changes to your product in Teachable and these updates are not immediately visible in the WordPress block, you can manually refresh the data by syncing it.
Teachable is a comprehensive online course creation and delivery platform that has gained significant popularity since its founding in 2014. It serves over 100,000 instructors and has facilitated more than $1 billion in course sales.
The platform offers a user-friendly interface for creating, hosting, and selling online courses and digital products without requiring technical expertise.
Key features include:
Plus, Teachable supports various content types, including videos, PDFs, quizzes, and assignments. This versatility allows for diverse and engaging learning experiences.
{{coursecurriculum-component="/blog-shortcodes/blog-popup"}}
This pairing brings together Teachable's robust course delivery system with WordPress's flexibility and extensive features.
The Teachable WordPress plugin allows for easy embedding of Teachable courses and bundles directly into WordPress pages and posts. This integration ensures a seamless user experience, enabling students to browse and purchase courses without leaving your WordPress site.
The plugin automatically syncs product data, eliminating the need for manual updates and ensuring that course information is always up-to-date.
With WordPress's extensive customization options, you can tailor the appearance of your Teachable products to match your site's branding.
The plugin supports various blocks and shortcodes that let you display different elements of your courses, such as product names, descriptions, pricing plans, and enrollment counts. This level of customization ensures a cohesive look and feel across your site.
A seamless integration between Teachable and WordPress enhances the user experience by providing a unified platform for accessing course content. Students can navigate your WordPress site and enroll in courses without being redirected to a different platform.
This cohesive experience can lead to higher engagement and satisfaction, as users can easily find and access the information they need in one place.
Teachable offers built-in marketing tools like customizable sales pages, affiliate programs, and email marketing features. When integrated with WordPress, these tools become even more powerful thanks to WordPress's wide range of marketing plugins and SEO tools.
This integration helps you create effective marketing campaigns, optimize your site for search engines, and track your marketing performance comprehensively. With the rise of generative AI, writing and optimizing content is easier than ever. AI can generate engaging and tailored content for your audience, helping you attract and retain students.
AI-powered marketing tools can analyze user behavior and provide insights into the most effective strategies, enabling you to make data-driven decisions and improve your marketing efforts. AI can also automate tasks like sending email campaigns and managing affiliate programs, giving you more time to focus on creating quality educational content.
The Teachable WordPress Plugin integrates with Teachable's secure checkout system, ensuring that transactions are handled safely and efficiently. This integration provides a smooth purchasing experience for students, which can help increase conversion rates and build trust with your audience.
Additionally, Teachable handles all aspects of payment processing, including multiple currencies and automatic payouts, reducing the administrative burden on course creators.
Teachable provides reliable customer support and handles all technical aspects of course hosting, including security, backups, and updates. This ensures that your courses are always available and secure, allowing you to focus on content creation and student engagement.
WordPress also has a large community of developers and extensive documentation, providing additional support and resources to help you manage your site effectively.
Integrating Teachable with WordPress is generally straightforward, but you may encounter some issues along the way. Here are common problems and their solutions to ensure a smooth integration.
If your Teachable courses aren't displaying on your WordPress site:
If the integration isn't working properly:
If you're experiencing errors or unexpected behavior:
Issues with payment processing can disrupt transactions and cause frustration for students. To resolve payment issues:
Sometimes, course elements might not display correctly on your WordPress site:
Integrating Teachable with WordPress opens up a world of possibilities for your online education business. This powerful combination streamlines your workflow and creates a more engaging, professional experience for your students. The key to success lies in continuous optimization and staying attuned to your audience's needs.
As you implement this integration, it's crucial to pay attention to user feedback and analytics, using these insights to refine your approach. Experimenting with different layouts, content presentations, and marketing strategies becomes easier with the combined strengths of these platforms.
Teachable's robust course delivery system paired with WordPress's flexibility equips you to adapt swiftly to the ever-changing landscape of online education. Commit to ongoing learning and improvement, and you'll see your integrated platform become a cornerstone of your digital presence and business growth.
Yes, Teachable can be used alongside other WordPress plugins. However, ensure that there are no conflicts. If you encounter issues, try deactivating other plugins one by one to identify the conflict.
If you uninstall the Teachable plugin, the blocks you’ve added will remain but won’t sync new data. To fully remove the blocks, you need to manually delete them from your pages. Reinstalling the plugin requires re-entering your API key to reestablish the connection.
To ensure your Teachable content is always up-to-date on WordPress, enable automatic daily syncing in the Teachable plugin settings. Navigate to your WordPress admin dashboard, go to Settings > Teachable > Sync Data, and set the desired sync time.
For immediate updates, click the "Sync Now" button. This process ensures that any changes made on Teachable are reflected on your WordPress site promptly.
To install the Teachable WordPress plugin, go to your WordPress dashboard, navigate to the Plugins section, click Add New, search for Teachable, and then install and activate the plugin. After activation, connect your Teachable account by entering the API key in the plugin settings.

In this article, Jessica Sprague tells us why a gorgeous homepage is important and how she designed hers to earn credibility from 80K online students. One of the most frequently asked questions in our community is, “How do I get Jessica Sprague’s homepage?”
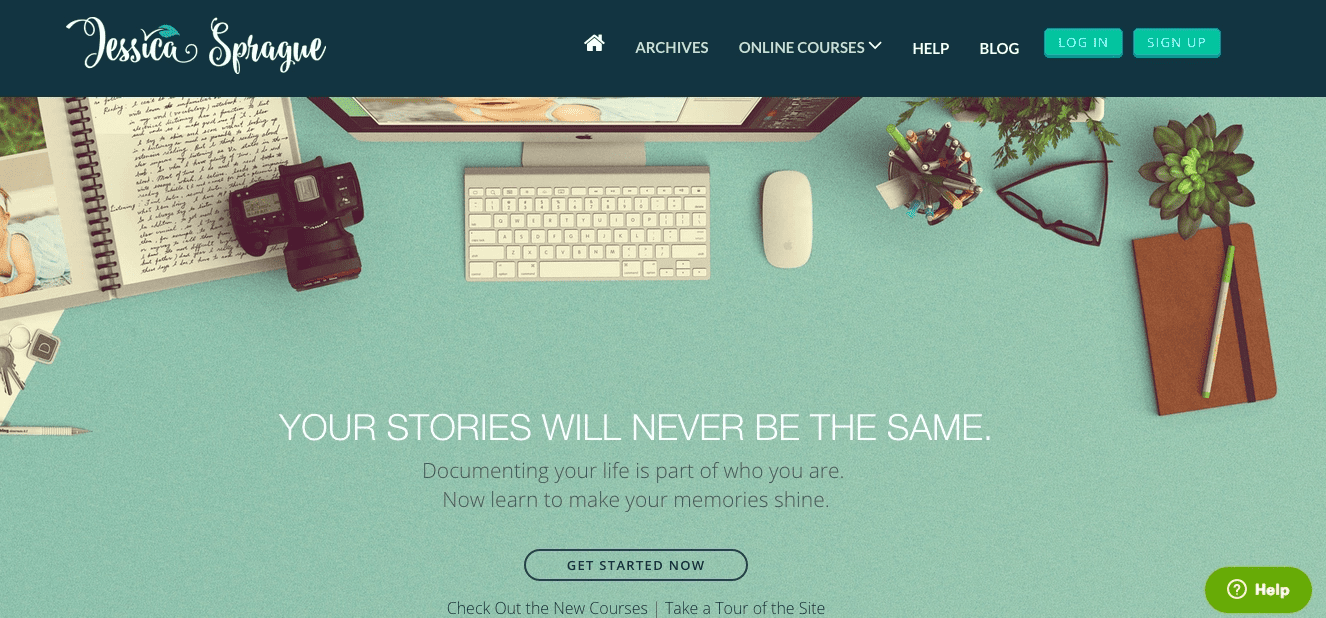
To be fair, Jessica is a master of her trade. For someone who fell into scrapbooking, she’s seen considerable success teaching digital tricks to crafters. In 2007, she launched a course called “Up & Running with Photoshop” that crashed her server. She now teaches through Teachable with over 80K students enrolled in her online course that quickly made over 20K in 4 months.
We asked Jessica if she’d join us for a joint-webinar and teach people how she set up and customized her online course. Specifically that gorgeous homepage. We’re not sure if Jessica knew what she was getting into, because after she said yes, we had over 600 people register.
Jessica’s designs are way more than just pretty. That sassy succulent does more than look fresh. It adds to the perceived value of Jessica’s information drawing in students and convincing them to buy her course.
“You know how they say image is everything, I hate that, and don’t think it’s true, EXCEPT for web design, in which, image actually is everything. What I mean is that in order to put across that credibility that we’re looking for, in order to invite people to trust you as their teacher, you have to be able to show them beautiful things. That is the toughest part, but I’m going to help you along the way.” – Jessica Sprague
Put simply, good design increases site credibility (and we all know that affects profits!).
The Stanford Credibility Project ran a study with more than 2,500 participants, “Nearly half of all consumers (or 46.1%) in the study assessed the credibility of sites based in part on the appeal of the overall visual design of a site, including layout, typography, font size and color schemes. (…) Beautiful graphic design will not salvage a poorly functioning Web site. Yet, the study shows a clear link between solid design and site credibility.”
Yoast nicely summarizes a technical study proving that people perceive a visually appealing website as usable due to the halo effect (you know, that one you learned in Psych 101 where beautiful people are presumed to be nicer, smarter, better whether or not they actually are). As in people, so in websites.
Conversionxl.com makes two gut-wrenching points. First, it only takes .05 seconds for someone to judge your website. Secondly, if they disapprove, they’ll leave immediately and continue to distrust you and your product in the future. It’s like meeting your dream date while wearing crocs. Yikes!
Hard Fact: You’ve done a lot of work to get people to your website, but if it’s poorly designed, it’s wasted effort.
In summary, good website design is pretty freaking high-leverage and important, and unlike my sprinkle doughnut, I’m more than happy to share.

{{homepageguide-component="/blog-shortcodes/blog-popup"}}
You’ve probably noticed that Jessica works in a field that values appearance, but web design is equally important if you’re selling music, medical care or another type of online course.
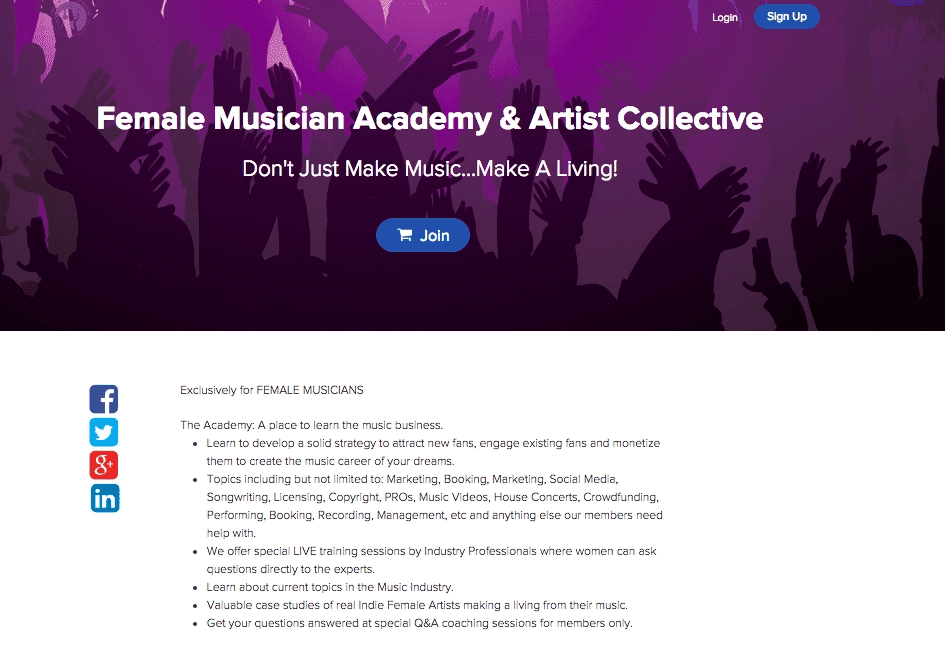
Looking at our own original data, Bree Noble, a Teachable instructor who sold her course Female Musician Academy at $290, was able to presell her course because of its stunning design.
“I was able to pre-sell my online course (Female Musician Academy) to 15 people at $290 ($4,350) without having any content in the school yet. In fact, my new students told me that my Teachable school was so beautiful that they could tell the course was going to be amazing.”
Another instructor, Jon Haws, who made $16,000 launching his course NURSING.com discusses why he values design:
“I’m trying to get everything as clean and crisp as possible and the logos and designs are still changing. With nursing specifically and with YouTube and the way that it is these days. You see that anyone can throw content out. Watching people make videos, well, it’s frustrating because they’re not always giving accurate content. But they’re getting out there and getting in front of people. My goal is to make the audio clean, video clean, logos clean, everything clean, and of course have accurate content, to be more trustworthy.”